Every website is incomplete without a login page. Login provides privacy to the user. So no one can access user data.
This post is about how to create a login form with HTML, design it with CSS, and validate it with constraints.
HTML structure of the login form
Here I used the <table> tag to give proper alignment to all elements. Look at the following output. All the fields are perfectly aligned.
 |
| Html structure of login form |
Designing login form with CSS
 |
| Login form |
You can also change width, height, padding, colors, backgrounds, borders, etc...
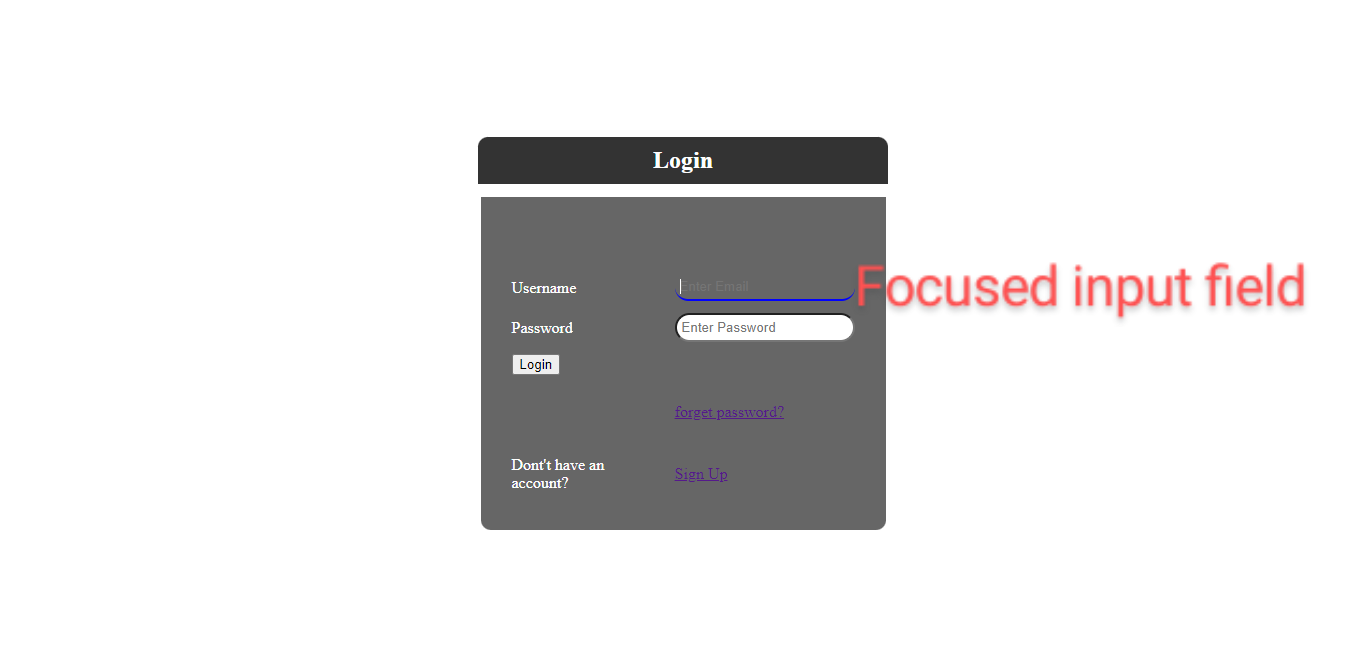
You can styles input fields by using input keywords or input attribute selectors. To apply CSS styles to a specific input type specify the selector as mentioned below.
 |
| Focused input field |
The login button is styled with transform and transition effects. When you hover over a button, the background color, and text color change and when clicked on it will translated on Y-axis.
 |
| Login form with box-shadow |
Validate login form with HTML 5 constraints
 |
| Login form validation |
1 2 3 4 5 6 7 8 9 10 11 12 13 14 15 16 17 18 19 20 21 22 23 24 25 26 27 28 29 30 31 32 33 34 35 36 | <!DOCTYPE html> <html> <head> <title>login form</title> <link rel="stylesheet" href="login.css"> </head> <body> <div class="box"> <form id="f1" name="log" method="post"> <table> <caption>Login</caption> <tr> <td><label for="em">Username</label></td> <td><input type="email" name="eml" placeholder="Enter Email" required></td><br> </tr> <tr> <td><label for="pass">Password</label></td> <td><input type="password" name="pwd" placeholder="Enter Password" minlength="8" required></td><br> </tr> <tr> <td> <input type="submit" name="logged" value="Login"></td> </tr> <tr> <td></td> <td><a href="#"><p>forget password?</p></a></td> </tr> <tr> <td>Dont't have an account?</td> <td><a href="#"><p>Sign Up</p></a></td> </tr> </table> </form> </div> </body> </html> |
CSS
body{
background-image:url(bg.jpg);
background-repeat:no-repeat;
background-position:center;}
.box{
margin:auto;
margin-top:200px;
background-color:#666666;
height:50%;
width:30%;
border-radius:0px 0px 10px 10px;
color:#FFFFFF;
box-shadow:7px 7px 5px #000000;
}
table{
margin-right:auto;
margin-left:auto;
padding:20px;
height:auto;
border-spacing:10px;
}
caption{
position:absolute;
top:140px;
left:35%;
background-color:#333333;
height:auto;
width:30%;
padding:10px;
box-sizing:border-box;
border-radius:10px 10px 0px 0px;
font-family:"Times New Roman", Times, serif;
font-size:24px;
font-weight:bold;
text-align:center;
box-shadow:3px 3px 3px #000;
animation-name:down;
animation-duration:3s;
animation-iteration-count:infinite;*/
}
input[type="email"],[type="password"]{
width:100%;
padding:5px;
box-sizing:border-box;
border-radius:50px;
}
input[type="email"]:focus,input[type="password"]:focus{
border:none;
border-bottom:2px solid #0000FF;
background-color:#666666;
color:#FFFFFF;
outline:none;
}
input[type="submit"]{
font-size:18px;
font-weight:bold;
width:50%;
padding:5px;
color:#FF0000;
background-color:#00FF66;
border-radius:50px;
border-bottom:5px solid #000000;
}
input[type="submit"]:hover{
background-color:#996699;
color:#00FF00;
}
input[type="submit"]:active{
transform:translateY(5px);
}
@keyframes down{
from{top:140px;color:#FFFFFFF;}
to{top:150px;color:#0000FF;}
}


~2.png)


0 Comments